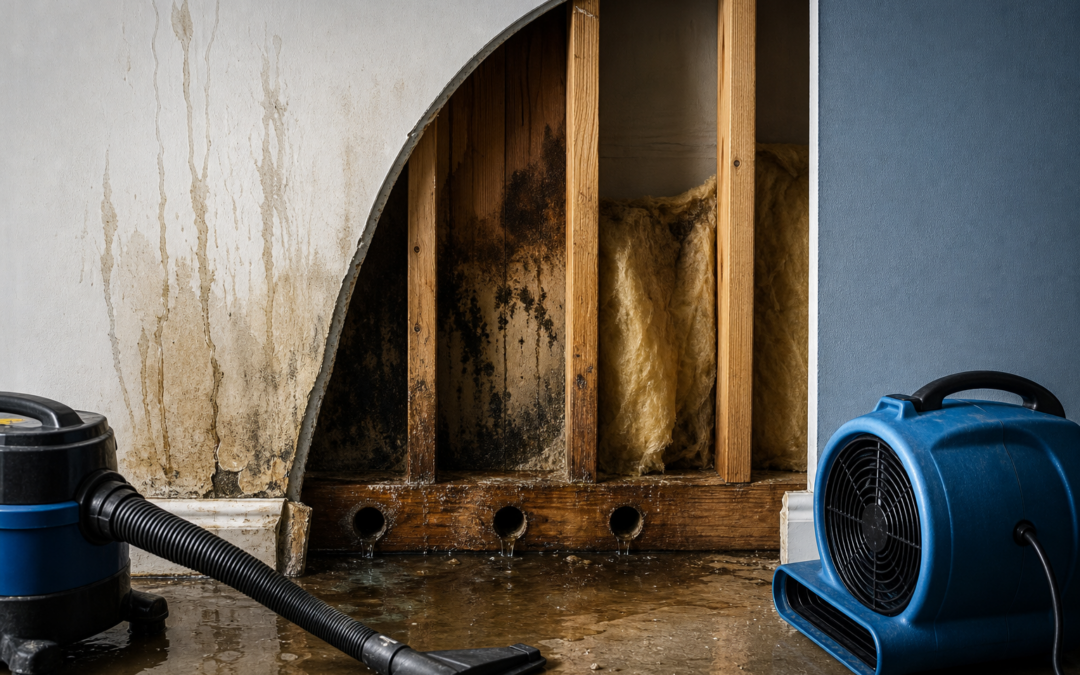
Moisture damage repair follows a fixed sequence: stop the water source, extract standing water, remove baseboards, assess whether materials can be saved or must be discarded, drill drainage holes if needed, run fans and dehumidifiers, then disinfect all salvageable surfaces. Acting within 24 to 72 hours is critical. Mold can begin growing before the wall looks visibly wet.
The repair sequence matters as much as any single step. Homeowners who skip straight to patching miss the hidden moisture that causes walls to fail again weeks later. This guide covers every stage in the order you actually do it, from shutting off the source through final disinfection and monitoring.
Mitigation vs. Restoration: What Moisture Damage Repair Actually Involves
Moisture damage repair splits into two phases, and confusing them is one of the most common reasons repairs fail. Mitigation comes first: it means stopping the damage from getting worse. Restoration comes second: it means returning the structure to its pre-damage condition.
Mitigation covers everything from stopping the water source to extracting standing water, removing saturated materials, and drying the wall cavity. Restoration covers replacing drywall, repainting, refinishing, and confirming the structure is sound. You cannot do restoration work on a wet wall. Closing up a cavity that still holds moisture traps the problem inside.
The scale of this issue in the US is significant. According to Verisk data reported by allcityadjusting.com, water-related issues represented 31.1% of all U.S. property claims in early 2026. The Insurance Information Institute reports that roughly 14,000 U.S. residents face water damage emergencies every day. Those numbers reflect how often the sequence goes wrong, whether because the moisture source was not fully identified, drying was cut short, or restoration started too soon.
South Florida's humidity makes this worse. When outdoor air stays highly humid for months at a stretch, a wall cavity that is "almost dry" stays wet long enough for mold to take hold. Skipping mitigation or rushing it is not a shortcut. It is a guarantee of a second repair.
How to Deal with Water Damage on a Wall: The Full Step-by-Step Process
Best moisture damage repair follows a fixed sequence. Doing these steps out of order, or skipping one because the wall "looks fine," leads to hidden mold, structural softening, and repairs that fail within months. Here is the complete process in the order you perform it.
-
Stop the moisture source and extract standing water. Find and shut off the source before anything else. A burst pipe means closing the supply valve. A roof leak means temporary tarping. A slow HVAC condensate leak means shutting down the unit. Once the source is controlled, remove any standing water using a wet-dry vacuum or pump. Do not start drying until the water is no longer actively entering the space.
-
Remove baseboards to let wall materials breathe. Vinyl and wood baseboards seal the bottom of the wall cavity. Water that enters through the wall collects there and has nowhere to go. Use a pry bar to pull baseboards away from the wall carefully, working from one end to avoid cracking them. If they are wood and have been saturated for more than 24 hours, set them aside for inspection. Many can be dried and reused if they are not warped or delaminated.
-
Evaluate the wall material and decide what stays and what goes. Run your hand along the drywall surface. Soft spots, bubbling paint, visible swelling, or a paper face that separates from the gypsum core all indicate that the drywall has absorbed water past the point of recovery. Drywall is cheap. Replacing it costs far less than treating mold that grows inside a wall you tried to save. Plaster and wood studs are more forgiving and can often be dried in place, but only if the water source was clean and the saturation time was short. The next section covers this decision in detail by material type.
-
Drill drainage and ventilation holes in the wall cavity if the material is being saved. If the drywall is staying, you need to open the cavity to allow airflow. Drill 1-inch holes approximately 2 inches above the floor line, spaced roughly 16 inches apart along the affected section. These holes let trapped water drain out and allow drying equipment to move air through the cavity. They are easy to patch with joint compound once the wall is confirmed dry.
-
Run fans and dehumidifiers to remove hidden moisture. Position axial fans (high-volume air movers) to push air across the wall surface and through the drainage holes. Pair them with a dehumidifier rated for the room size to pull moisture out of the air as it evaporates from the wall. In South Florida's climate, ambient humidity actively works against you. A standard box fan is not enough. Plan for at least three to five days of continuous drying, and use a moisture meter to confirm the wall cavity has reached an acceptable moisture level before closing it up. Do not guess.
-
Disinfect all salvageable surfaces and monitor for mold for up to 72 hours. Once the wall is dry, apply an EPA-registered disinfectant to all exposed framing, subfloor edges, and any other porous surfaces that were wet. Check the treated area daily for the first 72 hours after drying is complete. Any musty odor, visible spotting, or surface discoloration that appears after disinfection means mold has already taken hold and the scope of work has expanded beyond surface treatment.
Only after all six steps are complete and the wall cavity is confirmed dry should you move to restoration: replacing drywall panels, taping and mudding seams, priming, and painting. Restoring a wall that has not fully dried is the single most common reason homeowners end up doing the job twice.
When to Discard Drywall vs. When Wall Materials Can Be Saved
The discard-or-save decision depends on two things: the material itself and the category of water that caused the damage. Category 1 water is clean supply water from a pipe or appliance. Category 3 water is sewage, floodwater, or any water that has contacted contaminated surfaces. Category 3 water means porous materials come out, no exceptions.
According to plumbingcontractorsoftware.com, 11.6% of homes with interior leaks reported mold, compared to only 2.1% of homes without leaks. By the time mold is visible, it has already been growing inside the material for days. The table below gives clear guidance by material type.
| Material | Category 1 (clean water) | Category 3 (black/gray water) | Recommendation |
|---|---|---|---|
| Drywall (gypsum board) | Discard if saturated more than 24 hours or soft to the touch | Always discard | Drywall is inexpensive; when in doubt, replace it |
| Plaster walls | Can often be saved if dried quickly and surface is intact | Discard if contaminated | Plaster is denser and more resistant to water than drywall |
| Wood studs / framing | Can be dried in place if structurally sound | Clean and disinfect thoroughly; replace if structurally compromised | Check for soft spots or cracking before closing the wall |
| Insulation (fiberglass batts) | Discard; fiberglass batts hold moisture and cannot be effectively dried | Always discard | Replacement insulation is inexpensive relative to mold remediation |
| Hardwood baseboards | Inspect for warping; can be dried and reused if undamaged | Discard | Warped or delaminated wood will not sit flush after reinstallation |
One practical note: if you are unsure whether a material is Category 1 or Category 3, treat it as Category 3. Floodwater in South Florida during storm season carries contaminants even when it looks clean. The cost of replacing a section of drywall is minor compared to the cost of remediating mold that grew because you gave a questionable material the benefit of the doubt.
For a deeper look at the drywall replacement process specifically, the guide on water-damaged drywall repair covers cutting, patching, and finishing in full.
The 24 to 72 Hour Window: Why Timing Is Everything for Mold Prevention
Speed is the single biggest variable in how a moisture damage repair turns out. Mold spores are present in virtually every indoor environment. They need three things to take hold: a food source (drywall paper, wood framing), warmth, and moisture. In South Florida, two of those three conditions exist year-round. The third arrives the moment a wall gets wet.
The growth window opens fast. Most mold species begin colonizing porous materials within 24 to 48 hours of sustained moisture exposure. By 72 hours, colonies are established enough that surface disinfection alone will not eliminate them. You are no longer dealing with a wet wall. You are dealing with a mold problem that requires remediation.
That gap exists largely because of delayed response. A homeowner who waits a week to address a slow pipe leak behind a wall faces a fundamentally different repair than one who acts the same day.
The financial consequences of delay compound quickly. Professional structural drying jobs, where drying equipment, containment, and certified labor are all required, cost significantly more than a rental-equipment approach. Catch the problem in the first 24 hours and you may handle it with rental equipment. Wait past 72 hours and the scope almost always expands.
South Florida's humidity accelerates every part of this timeline. Outdoor relative humidity from June through November regularly runs high enough that a wall cavity that is damp rather than soaked can still sustain mold growth. Do not let the absence of standing water give you a false sense of time.
When Is Moisture Damage Repair Too Big a Job for DIY?
Some moisture damage repairs are manageable without professional help. A small pipe leak caught within a few hours, affecting a single section of drywall in a low-humidity room, is a reasonable DIY project if you have the right equipment and follow the full six-step sequence. Most jobs are not that simple.
Here are the conditions that move a repair beyond DIY territory:
- The affected area exceeds 10 square feet. A widely cited industry guideline holds that mold patches larger than 10 square feet require professional remediation. This is not a hard regulatory threshold, but it reflects the point where containment, personal protective equipment, and negative air pressure, which means using fans to direct air out of the affected space rather than through the rest of the home, become necessary to prevent cross-contamination.
- The water source was Category 3. Sewage backup, storm floodwater, or any water that contacted contaminated surfaces carries bacteria and pathogens. Handling it without proper protective equipment and disposal protocols puts you at real health risk.
- Mold is already visible before drying is complete. If you open a wall cavity and find active mold growth, the job has moved from mitigation to remediation. Surface wiping will not address colonies that have penetrated into framing or insulation.
- Structural components feel soft or show visible damage. Soft studs, crumbling sill plates, or floor joists that flex underfoot indicate rot or significant moisture saturation. These are structural repairs that require professional assessment before any finishing work begins.
- The smell persists after drying. A musty odor that remains after three to five days of continuous drying means hidden mold is present somewhere in the cavity. A moisture meter and a visual inspection are not enough to find it.
The financial risk of underestimating scope is real. According to Angi's 2026 data, homeowners spend an average of $1,171 fixing mistakes made during DIY projects. In a moisture damage context, those mistakes typically mean reopening a wall that was closed too soon or treating mold that was not fully eliminated the first time.
For jobs that cross any of these lines, a professional water damage dade county restoration company such as SERVPRO uses industrial-grade extraction equipment, thermal imaging cameras to locate hidden moisture behind walls, and certified technicians who can produce the documentation insurers require.
Does Insurance Pay for Water Restoration?
Homeowners insurance often covers sudden and accidental water damage, but coverage depends entirely on the cause and your specific policy terms.
Damage from a burst pipe, a washing machine hose that fails without warning, or an appliance malfunction is typically covered under a standard homeowners policy. Gradual damage is a different matter. If an insurer can show that a slow leak went unaddressed for weeks or months, the claim is likely to be denied on the grounds of neglect. The same applies to flooding from storm surge or rising groundwater, which requires a separate flood insurance policy, not a standard homeowners policy.
The average water damage claim in the U.S. runs $12,514, according to Insurance Information Institute data. That figure gives you a sense of what a mid-size residential claim looks like, and why documentation matters. Before you begin any repair work, photograph every affected surface, note the date and time you discovered the damage, and keep records of any equipment you rent or materials you purchase.
Coverage hinges on three things:
- Report the claim promptly. Most policies require notification within a specific window after discovery.
- Do not discard damaged materials before an adjuster has seen them. Insurers need to assess the scope.
- Mitigation costs, meaning the work done to stop further damage, are generally covered even when the underlying cause is disputed.
The average cost of non-weather water claims increased by 63.16% from 2019 to 2025, based on LexisNexis data. Insurers are scrutinizing claims more carefully as a result. Thorough documentation and prompt action are your strongest tools.
How Royal Mold Specialist Handles Moisture Damage in South Florida
When a repair crosses into professional territory, the response time and scope of work matter as much as the equipment used. Royal Mold Specialist is a mold remediation and water damage company serving residential and commercial properties across more than 20 cities in South Florida. You can book an appointment online or by phone.
Prices and plan limits verified as of November 2026.
FAQs
How long does restoration take after water damage?
Drying alone typically takes three to five days with proper equipment running continuously. Restoration work, meaning replacing drywall, taping, priming, and painting, cannot start until the wall cavity is confirmed dry with a moisture meter. For a small, single-wall repair caught early, total time from discovery to finished wall is often one to two weeks. Larger jobs involving structural components or mold remediation take longer.
Can I paint over water-damaged walls without repairing them first?
No. Paint does not seal in moisture or stop mold growth. If you paint over a wall that is still damp or has active mold, the paint will bubble, peel, or stain within weeks, and the mold will continue growing underneath. The wall must be fully dried, any damaged drywall replaced, and all surfaces disinfected before you apply primer or paint.
What are the signs that moisture damage inside a wall is getting worse?
Watch for paint that bubbles or peels without an obvious cause, soft spots when you press on the drywall, a musty odor that does not clear with ventilation, and visible staining that spreads or darkens over time. Baseboards that begin to bow or separate from the wall are another indicator. Any of these signs after a repair means hidden moisture is still present.
How do drainage holes in a wall cavity work, and do I need to patch them afterward?
Drainage holes are small openings, typically about 1 inch in diameter, drilled just above the floor line along the affected wall section. They let trapped water drain out and allow fans to push air through the cavity rather than just across the surface. Once a moisture meter confirms the cavity is dry, you fill the holes with joint compound, sand smooth, prime, and paint. The repair is invisible after finishing.
Is it safe to stay in a home while water damage repairs are being done?
It depends on the scope and the water category. A small Category 1 repair in a single room is generally safe if the affected area is isolated and you are not sleeping in that room. Category 3 water, meaning sewage or floodwater, introduces bacteria and pathogens that make the affected area unsafe until professional remediation and sanitizing are complete. If mold remediation is underway, the affected area should be under containment and off-limits until post-remediation verification is done.
Conclusion
Moisture damage repair follows a fixed sequence for a reason. Drying must be complete before restoration begins, and the category of water that caused the damage determines which materials can be saved. Acting within the first 24 to 72 hours is the single most important factor in keeping the repair manageable and preventing mold from taking hold inside the wall cavity.
If your situation checks any of the boxes in the DIY decision list, such as an area larger than 10 square feet, Category 3 water, visible mold before drying is done, or soft structural components, get a professional assessment before you close up the wall. A second repair costs more than getting the first one right.